Followers

Saturday, July 31, 2010

Side Wheeler

The Lindberg 1/128 Mississippi Side Wheel Steamer converted to 1/72nd scale. Here is a close up of the upper works. I put a sheet of Evergreen plastic styrene to simulate a wooden deck. I drilled holes in the deck and inserted some plastic rod from an old Matchbox Flower Class Corvette. The plastic rod is for the railings on the corvette.

Essentially this is the port side of the completed model. It still has to be primed and then painted. Note the addition of doors, boat hooks, life rings, and guns.


Guns are from Britannia Miniatures in white metal. They include two 20mm AA guns and one 37mm AA gun at the stern.


I left a lot of open deck space to evacuate refugees, stranded and bypassed soldiers and cargoes. Since this is a wargame ship, I wanted to include some play value for the model.


I added a boom crane for the bow and the Nazi eagle is from an old Matchbox armor kit, it was on the wall of a building. Squares on the walls represented blanked off windows. Life ring from Matchbox Flower Class Corvette. Anchor from the spares box.

Friday, July 30, 2010

Riverboat


For those interested in the Lindberg Mississippi Steamboat, here is the latest from the Squadron catalog. Squadron Hobbies in Texas, USA provides excellent service and this kit is actually on sale now.


You can see the detail of the new deck planking. Originally the upper works were smooth. I have added the gun tube and the gun.


I also included some rails I got off one of my Flower Class Corvette models. They need a little adjustment at this point and the top rail has yet to be applied.


The new railing is from a model railroad building. Revell KM figure for size.


The stairs are from the scrap box. Making a model into a much larger scale kit is quite the challenge, you have to upsize everything!


Thursday, July 29, 2010

Side Wheel Steamer


I have been working more on my Lindberg side wheel steamer. It is 1/128th scale according to the Squadron Catalog. I blocked in the lower deck area and added new, much larger doors.


The original smoke stacks are very tall and side by side. I cut them down substantially and moved them to a front to rear configuration. I also moved them back a bit.


The starboard side looking bow to stern. Blocked in lower deck and two new sets of doors.


A Revell WWII German sailor helps with the construction. Altering the scale of the boat from 1/128 scale up to 1/72nd scale is a difficult project.


I got this 37mm gun from Britannia Miniatures. Then using styrene from Evergreen I made a nice gun tub for it. This gun will be mounted on the stern of the upper deck to protect against Soviet air attack.


Wednesday, July 28, 2010

Pegasus French


A sneak preview for the Pegasus WWI 1/7nd scale French Infantry set. This is a preproduction sprue of these figures. The final color has yet to be determined but will more likely be some kind of olive drab type color. Not unlike the Atlantic WWII French that were out twenty years ago.


This sprue is the Pegasus WWII French Infantry set. The WWII set is also a preproduction set and will probably be in an olive drab type color. As you can see the weapons are without bayonets and are much shorter, the MAS 36 rifle in most cases.
These will be two separate sets but most of the WWI figures will also work for WWII as there was a lot of older kit still in use in 1940. This is particularly true of the reserve and rear echelon troops. This plastic is glueable with CA type glues, and I suspect the same will be true of the production versions. Use a good quality CA glue, I use Zap-A-Gap. Stale glue often will not work on this plastic.
Pegasus is still waiting for the color selection, the box art and production to begin, but the figures are done, that's that hard part and the part that takes the longest. It will still probably be months before these are at your local hobby shop. Larry Pegasus gave these two sprues for me to review, certainly they will reinforce my Vichy French in North Africa or my FFL in French Indochina.
These are excellent figures and I am sure the WWI sets will enter my collection to fight alongside my Imex WWI Doughboys. I will have full photos of these troops in the next few days.

Tuesday, July 27, 2010

Painting Trucks


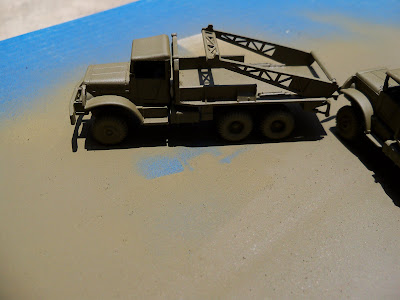
My Brockway CMSC pontoon bridge cranes and Roco cranes being painted. I always use spray and air brush paints outside, in daylight. I do most of my painting in the summer when the humidity is low.

Generally, I don't prime plastic models that are being painted a color similar to the plastic color.


In this case the CMSC are resin and white metal so I when ahead and primed the Roco too. I figured it would give a more uniform color to the three vehicles.


The three trucks with the basic OD green overall.


The trucks are sitting on a bit of cardboard. I like to use a clean surface that is disposable when I paint. That way I don't have to do much clean up.


Monday, July 26, 2010

CMSC MLRS


CMSC did many models in 1/87th scale. This is their MLRS. You can see a completed one in the background. The missile box is in front of the launcher platform.

These resin / white metal kits were highly detailed. I got it at least ten years ago.


This shows the underside of the resin cab.


As you can see from the photos, there are lots of tiny little parts on this model, most in white metal.


The resin is some of the best I ever saw, you can see how thin this part is, like paper. Resin kits are generally not too hard. They cut and saw much like soft wood. They glue well with the same glues you use on white metal, super glues and epoxy being the best in my opinion. I also use some rubber glues, like Goo when I need something that is very sticky.

Sunday, July 25, 2010

Trucks and Decals


When I apply decals I use Micro Set and Micro Sol. They help the decal to adhere to the surface and soften the decal so it conforms to the surface of the model. Not all model surfaces are smooth and flat so softening the decal is important.

Here are my three Brockway cranes. Two CMSC resin / white metal kits and one Roco plastic kit, in all plastic. To apply decals, first paint the surface to be decalled with a clear gloss. I like to use Tamiya Clear for small areas or Testors spray can Clear. Once the clear is dry, select the decals and cut them out as close as you can to the image with scissors. Soak the image in water. Once it slides away, paint the surface of the model with the Micro Sol. Remove the decal from the water and touch it to a tissue to remove excess water. Then place on the model. Paint over the decal with the Micro Set. I use a paintbrush to maneuver the decal into place.


Once completed the two models were almost indistinguishable, Roco plastic or CMSC metal / resin.

Saturday, July 24, 2010

CMSC Truck


Many years ago I purchased a number of vehicles by CMSC in HO scale. Two of them were these Brockway cranes. They are identical to the Roco vehicle, except they are resin and white metal.

Two CMSC trucks with a Roco one. The CMSC build just like the Roco, which is not easy in metal. No allowance was made for the change in materials.


The gleaming white metal bumper is very impressive!


An excellent view of the underside of the CMSC. It is just like the Roco.


Hard to see the undercarriage, but you can see the wheels are the same. With all the changes, I am not sure if either the Roco or CMSC version of these trucks are still available. It was an important US Army vehicle for moving pontoon bridge equipment.


Friday, July 23, 2010

Russians in Prone Position


More Russians from Ykreol in 1/72nd scale plastic. Another submachine gunner.


This man has two grenades at the ready.


Most of the prone Ykreol figures have their heads up and look pretty good at ground level.

I have placed three of them together as if they are a mortar team. Imaging a Pegasus or Esci Russian mortar crew with three as additional team members arrayed around the mortar. That is my plan for many of them. A very useful set from my friend Yves at Ykreol.


Thursday, July 22, 2010

Prone Russians


Ykerol 1/72nd scale WWII Soviet troops. The whole set is prone, part of their series of prone figures. This guy has a map with him. He would be ideal as an artillery observer, engineer or even an officer or scout on a recon mission.

PVT Ivan with his rifle.


Laying in wait with a grenade. This guy would go well with the rifleman to man an outpost.


Another rifle armed soldier. These guys would look good lined up along a tree line or in shallow trenches.


The very common PPSH submachine gun. I might use this guy as another machine gun crewman. Many sets only give you one or two guys for mortar or machine gun crews, this set would help to rectify that problem. I got these from my friend Yves for review.


Wednesday, July 21, 2010

Ykreol Russians


Ykreol@hotmail.fr has released their new Soviet Soldiers 1939- 1945 set.


This set is all soft plastic single piece figures.


All of the figures in the set are prone and on a little base. This guy has an 82mm mortar tube.


These guys will work well with other plastic figures, particularly the old Esci Soviet Infantry.


They can add more poses to existing sets or act as a stand alone set, but a unit of all prone figures would be an unusual wargame army. Mine will not doubt serve with my Esci Soviets as artillery, mortar crews and engineers. Useful set! My friend Yves at Ykreol sent them to me for review.

Tuesday, July 20, 2010

Me 109 Aircraft


When I have money, I buy models. When I have time, I put them together. Here are two old soldiers. These are the Matchbox 1/72nd scale Me 109 fighter plane. A very easy styrene plastic kit.


I got them a while back at a kit collector show. They have been sitting around waiting to be put together for at least five years. I really liked Matchbox kits. They always had at least two colors of plastic, sometimes three for the bigger kits. The instructions were easy and the planes had pilots.


This one was a rather odd yellow plastic, you can see where I painted the inside gray. The yellow was so thin and translucent that you can see the dark spot where the paint is located. As you have guessed, I generally assemble my planes and then paint them afterwards. I often paint them in a large group. I have over two dozen Me 109 airplanes, and I don't think a one of them is finished. Maybe later this year. I am working up to a big building spree of Me 109 aircraft by Heller. I have about ten of them to put together.