Bunker Talk blog with 30,000 photos of my toy soldier collection of Roco Minitanks, Heiser Models, Fidelis Models, Airfix and Pegasus figures; and 54mm & 60mm plastic soldiers from Tim Mee, Elastowit, BMC, MPC. Be sure to follow Bunker Talk. Email at BunkerMeister45@aol.com. Get merch at: https://www.redbubble.com/people/bunkertalkwar/shop
Followers
Saturday, June 30, 2012
Space Travel
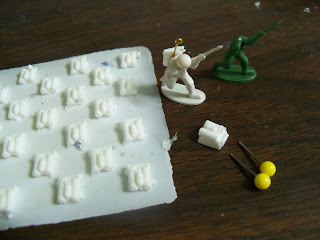
I like looking for bits at the dollar stores. A few years ago I found some cheapo soldiers with limited detail. They appear to be similar to the Airfix US Marines, but these have far less detail. The weapons are hardly more than sticks with big sights on the end. Perfect for what I wanted.
I found an old flamethrower in the spares box and modified it works as backpack oxygen tanks. These two map pins work for a new helmet. The model ship jackstays are perfect for an antenna.
Junky soldier gets his head cut off, a new helmet, backpack, and antenna and now he is a spaceman. I am doing about 300 of these, and will include a few other sets of troops to provide support and command troops.
Friday, June 29, 2012
Yo Ho Yo Ho
My good friend Richard Garretson is a Master Modeller as these few photos will attest.
This is a tiny portion of his 28mm pirate collection.
Richard has an ability to paint that is just increadible.
The ships are toys he got at the swap meet for pennies on the dollar, he converted them and painted them up into masterpieces.
Many of the items are scratch built or conversions. Find more photos at
www.warin15mm.com/Pirates.html
Thursday, June 28, 2012
German Tiger II
Three Roco Tiger II tank hulls with new fixed turrets.
This one looks much like the Hunting Tiger with no gun.
This is similar but only half the length of the Hunting Tiger turret.
This one is similar but has many domes and boxes on it. I think it looks like radar and sensors.
I figure on using them as command, telemetry and tracking vehicles for missile testing perhaps.
Wednesday, June 27, 2012
German Tiger Tank
Since I had the dragon primer out, I decided to prime some more stuff.
I got it from Brookhurst Hobbies, in Garden Grove, CA.
Roco Minitank, from Fidelis Models, I have modified it and now I am priming it.
I have three new turrets for these old soldiers to use.
A light coat of primer so the metal turret and plstic body will provide a uniform painting surface.
Tuesday, June 26, 2012
Fantasy Dragon
While the yellow and orange dragon is colorful, it did not fit my image of a dragon.
So I sprayed it with primer and then with two different, but similar shades of green from Tamiya.
The underside is ever so slightly ligher than the top side.
Both sides of the dragon will be very glossy.
The complex pose of the dragon made getting into every tiny fold very difficult.
I took parts of three days to paint the green.
It turned out exactly like I wanted it to look.
Monday, June 25, 2012
Dragon
Went to Michaels the other day.
I had a coupon.
Found this Safari, Ltd, Fire Dragon.
Molded in bright colors and painted well.
It has three heads and breathes fire.
Makes a nice opponet for this 1/72nd scale St. Michael.
Sunday, June 24, 2012
Puma
Two companies of Puma, 50 armored cars.
Six per platoon.
Four platoons.
One HQ vehicle, for a company of 25 Puma's.
They will have their turret hatches checked, glued and repaired or replaced.
All of them will get bumpers too.
Saturday, June 23, 2012
Nazi German Armor
I found that putting a Roco 234 armored car in a Dixie cup it would hold just the right position to allow me to glue on the bumper supports. I had to scrape the paint off the corners of the front of the upper part of the lower hull. I glued a plastic bead on each of the two corners. Most beads are glass and don't work very well. I found about a million plastic beads from two bucks at a bead shop. Well, maybe a thousand or so.
Plastruct 1.5mm plastic coated wire, trimmed to one inch lengths and then bent each end with pliers.
They look pretty good once they are glued on.
I initially glue them with vast amounts of Plastuct glue and later added 5 minute epoxy to strengthen them.
The two new 7.5 cm anti-tanks guns L/48 mounted in the 234 chassis.
Various bits on the workbench as I continue with my upgrade of the Roco 234 series of armored cars.
Friday, June 22, 2012
Paper Panzer Armored Car
Panzer Tracts by Thomas L. Jentz & Hilary Louis Doyle is a wonderful book.
This will be a Schwerer Panzerspaehwagen Sd.Kfz.234 with 7.5 cm Aufklaerungs-Kanon L/48 as found in that book. It is a shortened version of the 7.5 anti-tank gun for use in armored vehicles. The Germans may have made one or five or none depending on who you believe. This Roco 234 armored car hulk is going to meet up with a Roco Grille gun from the junk box.
The bottom of this armored car is supposed to be flat. It's bowed from exposure to heat. That's why this one went to the junk pile originally. Now it's being resurrected.
First thing is to trim down off the end of the barrel. Then cut of the breech. Then cut the breech end of the barrel.
Cut the end off the 234/3 barrel. It will become the mount for the new barrel.
Here is a look at the new barrel in three places and more of the same type of parts they were made from, to make a second gun barrel.
Here is the new barrel compared to a PaK 40 barrel in 1/72nd scale.
Subscribe to:
Comments (Atom)


